DIY Geothermal Heat Pump in Floor Heating Plumbing Diagram: A Comprehensive Guide
Hey there, folks. Are you tired of relying on traditional heating methods that not only harm the environment but also burn a hole in your pocket? Well, you’re in luck because today we’re going to talk about a game-changing alternative: DIY geothermal heat pumps. In this article, we’ll dive deep into the world of DIY geothermal heat pumps and provide you with a detailed in-floor heating plumbing diagram to get you started.
What is a Geothermal Heat Pump?
Before we dive into the nitty-gritty of DIY geothermal heat pumps, let’s first understand what a geothermal heat pump is. In simple terms, a geothermal heat pump is a system that harnesses the natural heat of the earth to provide warmth to your home. It’s like having a personal heating system that’s both eco-friendly and cost-effective.
Benefits of DIY Geothermal Heat Pumps
So, why should you consider a DIY geothermal heat pump? Here are some benefits that’ll make you go green:
- Energy Efficiency: Geothermal heat pumps are incredibly energy-efficient, with some systems providing up to 4 units of energy for every unit of electricity used.
- Cost-Effective: While the initial investment may seem steep, DIY geothermal heat pumps can save you money in the long run by reducing your energy bills.
- Environmentally Friendly: Geothermal heat pumps are a renewable energy source that produces zero emissions, making them a great choice for eco-conscious homeowners.
- Low Maintenance: Geothermal heat pumps require minimal maintenance, as they have few moving parts and are protected from the elements.
DIY Geothermal Heat Pump in Floor Heating Plumbing Diagram
Now that we’ve covered the basics, let’s move on to the fun part – creating a DIY geothermal heat pump in-floor heating plumbing diagram. Here’s a step-by-step guide to help you get started:
Loop Field Design
The loop field is the underground piping system that collects heat from the earth. Here’s a basic design:
- Horizontal Loop: This is the most common design, where pipes are laid horizontally in trenches 3-6 feet deep.
- Vertical Loop: This design is used in areas with limited space, where pipes are drilled vertically into the earth.
- Slinky Coil Loop: This design uses a coiled pipe that’s placed in a vertical trench.
Pump and Heat Exchanger
The pump and heat exchanger are the heart of your DIY geothermal heat pump system. Here’s what you need to know:
- Pump: You’ll need a pump that can handle the pressure and flow rate required for your system. Look for a pump that’s specifically designed for geothermal applications.
- Heat Exchanger: The heat exchanger is where the magic happens – it transfers heat from the loop field to your home. You can use a plate heat exchanger or a shell and tube heat exchanger.
In-Floor Heating Plumbing Diagram
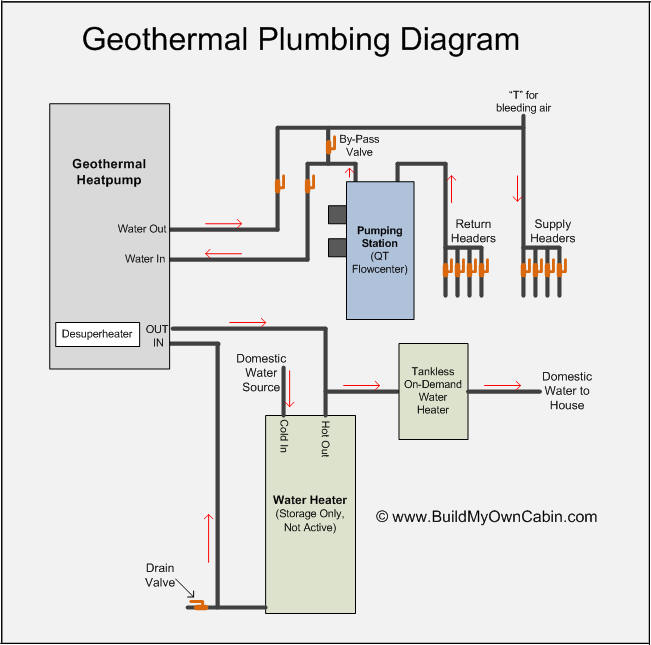
Here’s a basic in-floor heating plumbing diagram for your DIY geothermal heat pump system:
Loop Field → Pump → Heat Exchanger → Distribution Manifold → In-Floor Piping → ThermostatIn-Floor Piping
The in-floor piping is what distributes heat to your home. Here’s what you need to know:
- PEX Tubing: PEX (cross-linked polyethylene) tubing is a popular choice for in-floor heating due to its flexibility and durability.
- Manifold: The manifold is the central hub that distributes heat to different parts of your home.
Thermostat and Controls
The thermostat and controls are what regulate the temperature in your home. Here’s what you need to know:
- Thermostat: Look for a thermostat that’s specifically designed for geothermal systems.
- Controls: You’ll need controls that can regulate the pump, heat exchanger, and distribution manifold.
DIY Geothermal Heat Pump in Floor Heating Plumbing Diagram: A Real-World Example
Let’s take a look at a real-world example of a DIY geothermal heat pump in-floor heating plumbing diagram:
Loop Field (Horizontal Loop):
  * 1000 feet of 1" PEX tubing
  * 500 feet of 1/2" PEX tubing

Pump and Heat Exchanger:
  * 1 hp pump (100 gpm)
  * Plate heat exchanger (100 kw)

Distribution Manifold:
  * 1" PEX tubing
  * 10 ports

In-Floor Piping:
  * 500 feet of 1/2" PEX tubing
  * 10 loops (50 feet each)

Thermostat and Controls:
  * Geothermal thermostat
  * Pump controller
  * Heat exchanger controller
Conclusion
And there you have it – a comprehensive guide to creating a DIY geothermal heat pump in-floor heating plumbing diagram. Remember, while this is a complex project, the benefits of a geothermal heat pump are well worth the effort. So, go ahead and get creative with your DIY geothermal heat pump in floor heating plumbing diagram. Happy building!