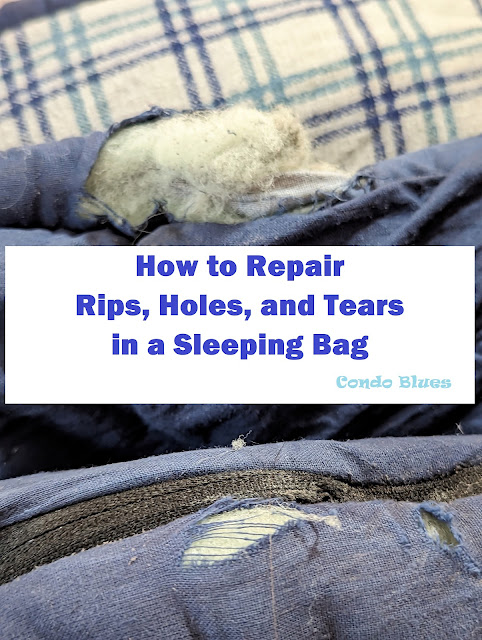
How to Repair Sleeping Bag Rip: A Step-by-Step Guide
Are you tired of tossing and turning in your sleeping bag, only to find out that it’s got a rip in it? Don’t worry, buddy, we’ve got you covered. In this article, we’ll show you how to repair sleeping bag rip in no time. Whether you’re a seasoned camper or just starting out, this guide is perfect for anyone who wants to learn the basics of sleeping bag repair.
Preparation is Key
Before you start repairing your sleeping bag, make sure you’ve got all the necessary materials. You’ll need:
- A seam sealer (like Seam Grip or Seam Sealer)
- A repair patch (specifically designed for sleeping bags)
- A needle and thread (matching the color of your sleeping bag)
- A pair of scissors
- A flat surface to work on
If you’re planning on using a repair kit, make sure you’ve got all the necessary components. Some kits come with specialized tools, like seam rollers and patch cutters. Read the instructions carefully and make sure you understand what you’re doing before you start.
How to Repair Sleeping Bag Rip: The Basics
When it comes to repairing sleeping bag rips, the key is to be gentle and precise. Don’t try to force the fabric or pull too hard, as this can cause further damage. Here’s a step-by-step guide on how to repair sleeping bag rip:
Assessing the Damage
Before you start repairing the rip, take a close look at the damage. Check to see if the rip is located on a seam or on a panel. If the rip is on a seam, you’ll need to use a seam sealer to reinforce the area before applying a repair patch.
Cleaning the Area
Use a soft-bristled brush or a cloth to gently clean the area around the rip. Remove any dirt, debris, or loose threads that could interfere with the repair process.
Applying Seam Sealer (If Necessary)
If the rip is on a seam, apply a small amount of seam sealer to the area. Use a cotton swab or a small brush to spread the sealer evenly, making sure to cover the entire seam. Let the sealer dry completely before moving on to the next step.
Cutting a Repair Patch
Use scissors to cut a repair patch that’s slightly larger than the rip. Make sure the patch is cut from a piece of fabric that matches the color and texture of your sleeping bag.
Applying the Repair Patch
Place the repair patch over the rip, making sure it’s centered and even. Use a small amount of seam sealer to attach the patch to the sleeping bag. Use a needle and thread to sew the patch in place, making sure to sew in a way that won’t compromise the insulation.
How to Repair Sleeping Bag Rip: Advanced Techniques
If you’re dealing with a larger rip or a more complex tear, you may need to use more advanced techniques. Here are a few tips on how to repair sleeping bag rip like a pro:
Using a Patch Cutter
If you’re using a repair kit, you may have a patch cutter included. A patch cutter is a specialized tool that helps you cut perfect patches every time. Simply place the patch cutter over the rip and rotate it until the patch is cut.
Using a Seam Roller
A seam roller is a tool that helps you apply even pressure to the seam sealer. This is especially useful if you’re dealing with a long seam or a complex repair. Simply place the seam roller over the seam sealer and roll it back and forth until the sealer is evenly distributed.
Using a Repair Kit with Specialized Tools
Some repair kits come with specialized tools, like patch cutters and seam rollers. These tools can make the repair process much easier and faster. Read the instructions carefully and follow the manufacturer’s guidelines.
Tips and Tricks
Here are a few tips and tricks to help you repair sleeping bag rip like a pro:
- Use a needle and thread that matches the color of your sleeping bag.
- Make sure the repair patch is slightly larger than the rip.
- Use a small amount of seam sealer to attach the patch to the sleeping bag.
- Sew the patch in place using a simple running stitch or a whipstitch.
- Use a seam roller to apply even pressure to the seam sealer.
Conclusion
And there you have it, folks. With these simple steps and advanced techniques, you can repair sleeping bag rip like a pro. Remember to be patient, take your time, and use the right materials. Happy camping!
How to Repair Sleeping Bag Rip: Final Tips
Before you head out on your next camping trip, make sure you know how to repair sleeping bag rip. Here are a few final tips to keep in mind:
- Always carry a repair kit with you, just in case.
- Practice makes perfect, so don’t be afraid to try out your repair skills on a small rip.
- Use high-quality materials and follow the manufacturer’s guidelines.
With these tips and techniques, you’ll be well on your way to becoming a sleeping bag repair pro. Happy camping, and don’t forget to repair sleeping bag rip!